> ## Documentation Index
> Fetch the complete documentation index at: https://developer.pdf.co/llms.txt
> Use this file to discover all available pages before exploring further.
# PDF Filler
Integrate this step into your **Zapier** workflow to:
* Add text, images and signatures to a **PDF**
* Fill **PDF** form fields
* Create a new **PDF** from a template
 ## Input
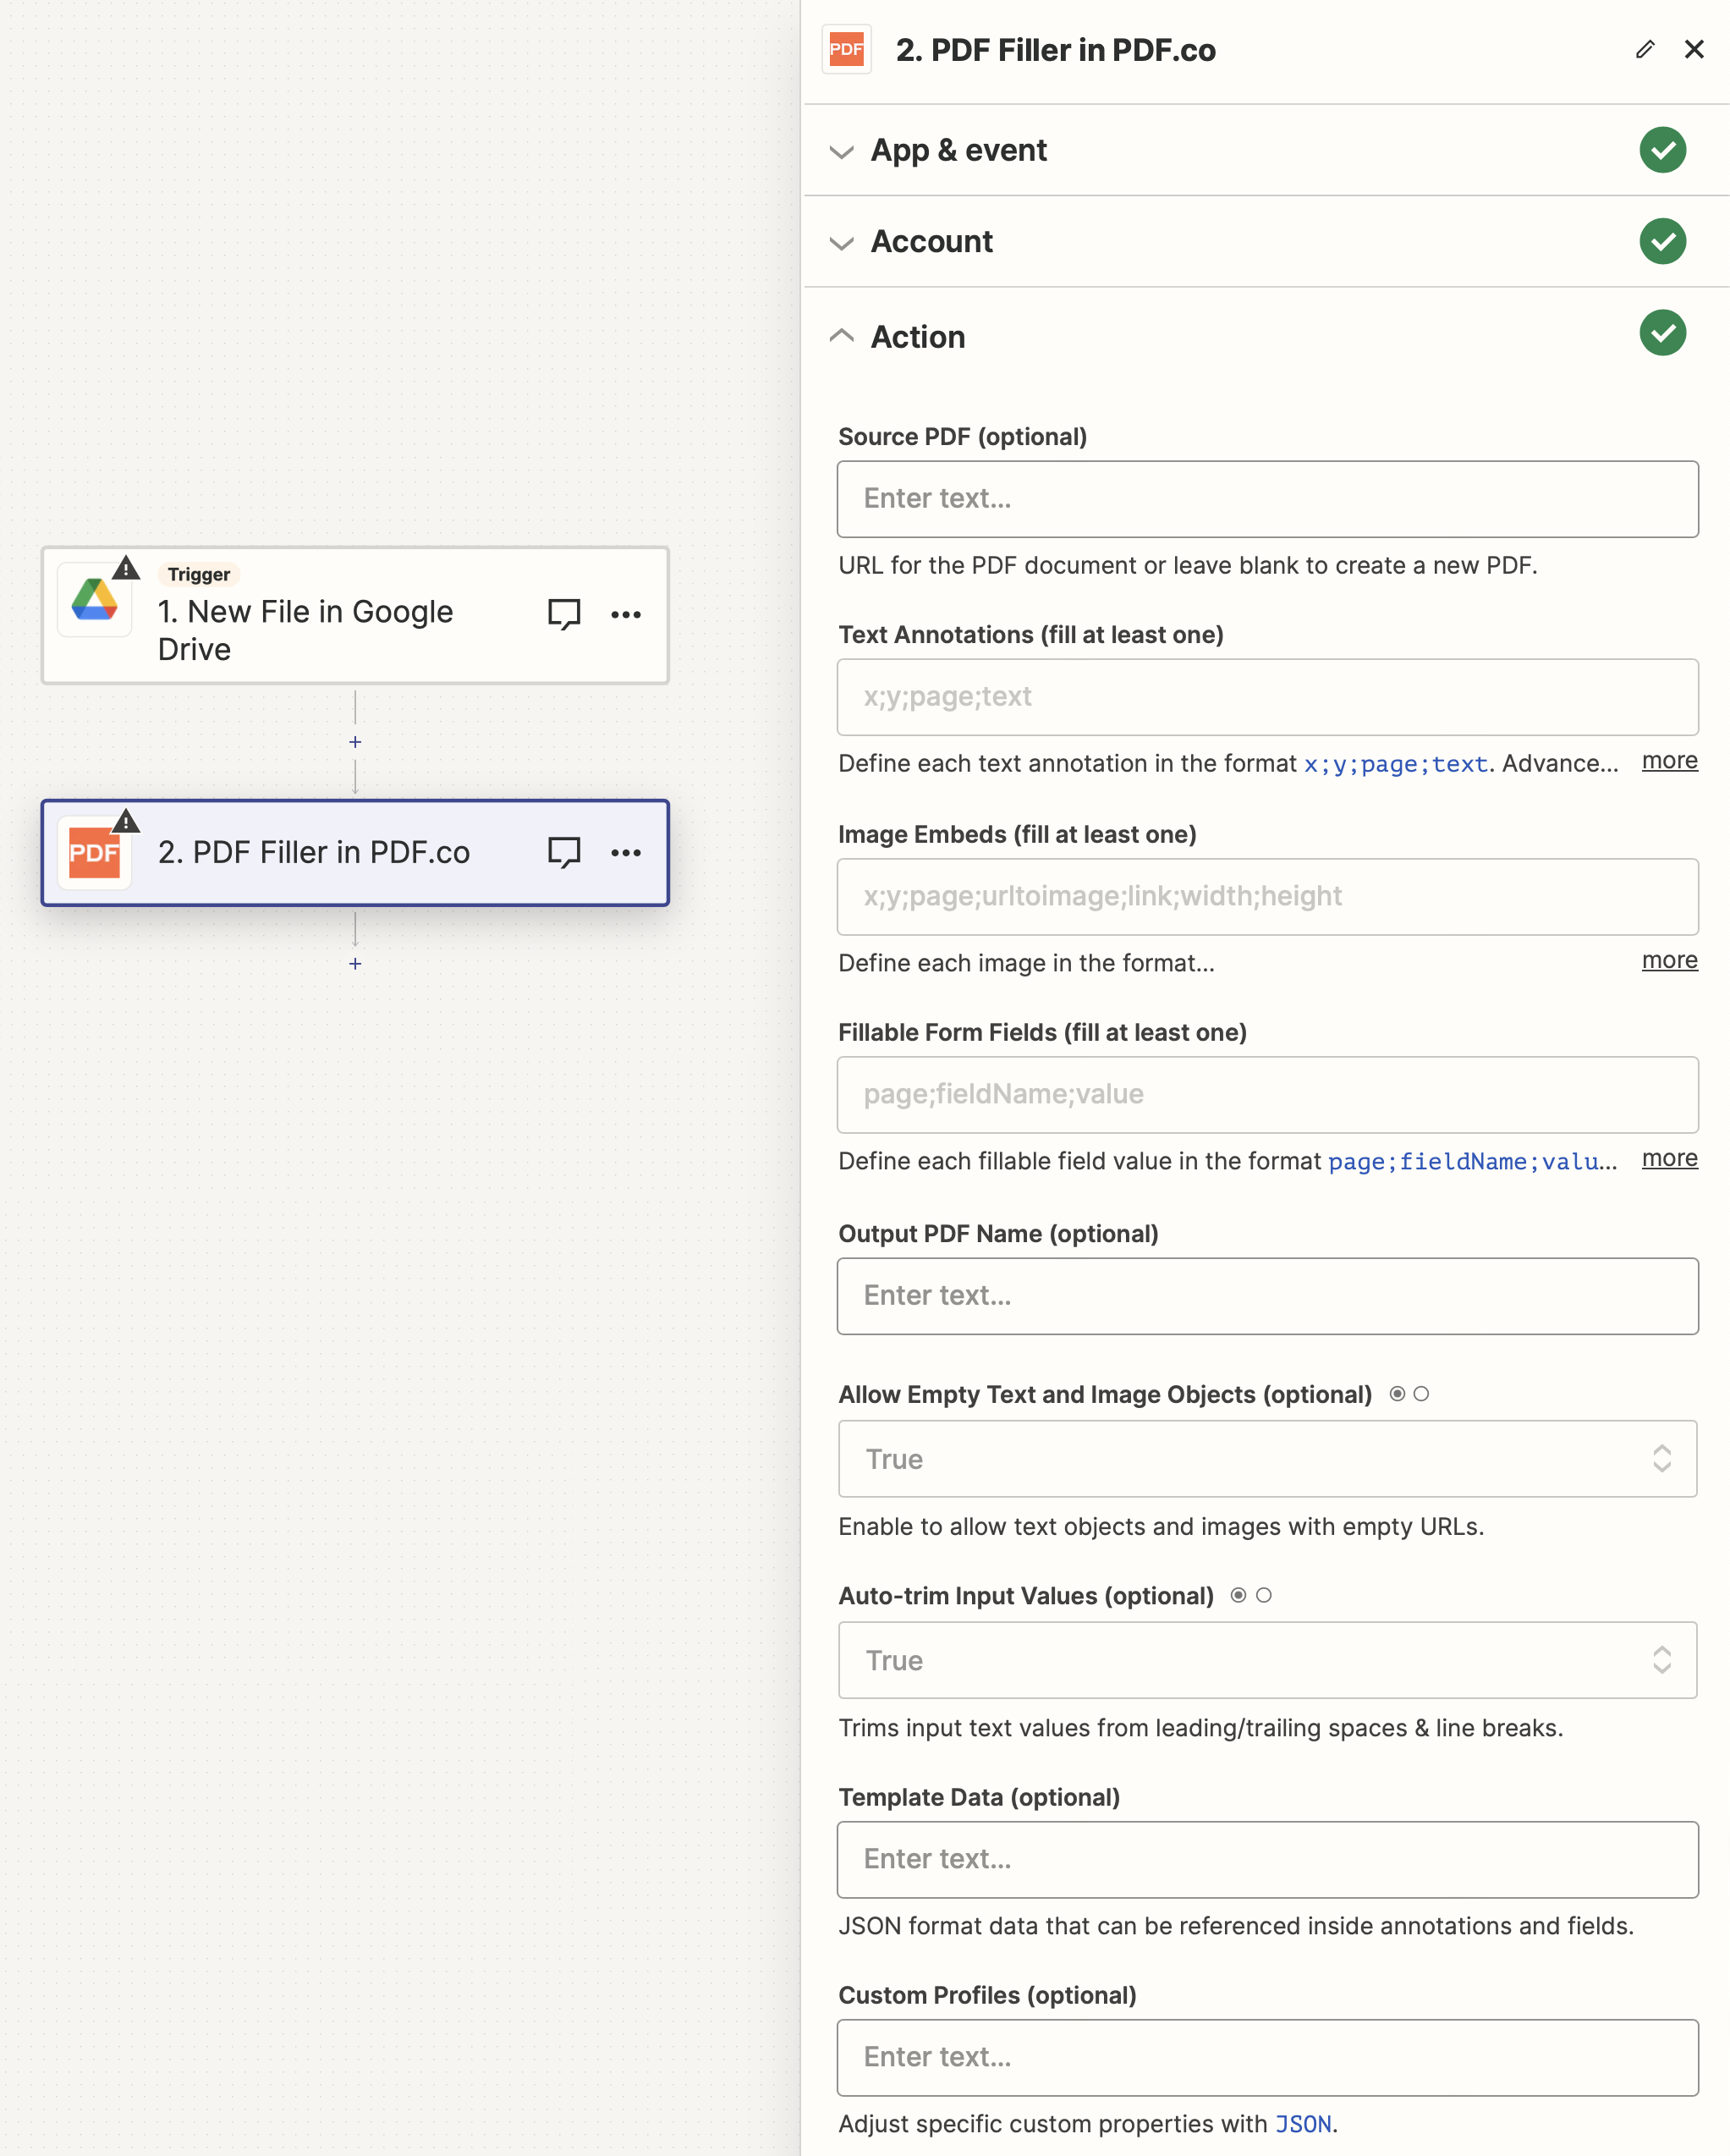
The Zapier action doesn't expose every PDF.co API parameter as a field. To pass a parameter that isn't shown, use the **Custom Profiles** field with `std_params`. See [Standard Parameters](/api/profiles#standard-parameters).
| Name | Description | Required |
| - | - | - |
| **Source PDF** | Provide the URL of the PDF document, or leave blank to create a new PDF from scratch. | No |
| [**Text Annotations**](#text-annotations) | Specify each text annotation using the format `x;y;page;text`. See [Text Annotations](#text-annotations) for more information. | Fill at least one |
| [**Image Embeds**](#image-embeds) | Define each image using the format `x;y;page;urltoimage;link;width;height`. Use PDF.co [PDF Inspector](https://app.pdf.co/pdf-edit-add-helper) to find or measure PDF coordinates. | Fill at least one |
| [**Fillable Form Fields**](#fillable-form-fields) | Specify each fillable field value in the format `page;fieldName;value`. Use the [PDF.co Info Tool](https://app.pdf.co/pdf-info) or the **Get PDF Info** PDF.co step for field names in PDF forms. | Fill at least one |
| **Output PDF Name** | Name of the output PDF file. | No |
| **Allow Empty Text and Image Objects** | Enable to process text objects and images even with empty URLs. | No |
| **Auto-trim Input Values** | Automatically removes leading/trailing spaces and line breaks from input text values. | No |
| **Template Data** | Input data in `JSON` format that can be used within annotations and fields. | No |
| **Custom Profiles** | A `JSON` string which adds options for the conversion process. See [Custom Profiles](#custom-profiles) for more. | No |
## Data Format and Examples
### Text Annotations
This parameter represents one or more text objects to add to a **PDF**. Each text object is made of a parameter separated by the ; symbol. It uses the format:
`x;y;pages;text;fontSize;fontName;fontColor;link;transparent;width;height;alignment`
#### **EXAMPLE** Sample code
Adds a text annotation, which links to `www.pdf.co`, to the `20,20` coordinate of all pages in a document (by using: `0-`). The text annotation uses the `Arial` font in red (by using `FF0000`) with a font size of `24`. It has a transparent background, a defined `300` by `200` bounding box and with text aligned to the `right`.
```text theme={null}
20;20;0-;Test Text;24;Arial;FF0000;www.pdf.co;true;300;200;right
```
#### **EXAMPLE** Sample code
Where `24` is the font size. You can also add styles along with the font size using the following modifiers:
* `+bold`
* `+italic`
* `+underline`
* `+strikeout`
```text theme={null}
20;20;0-;Testing Text;24+bold+italic;Arial
```
#### **EXAMPLE** Sample code
Another example with `bold`, `italic`, `underline` and `strikeout` styles would be as follows:
```text theme={null}
250;20;0-;Text1|250;30;0-;Text2|250;50;0-;Text3
```
#### **EXAMPLE** Sample code
To put multiple objects, just use the `|` separator between objects.
```text theme={null}
20;20;0-;Test Text;24;Arial;FF0000;www.pdf.co;true;300;200;right
```
If you need to insert a line break then use `\n` or `{{$$newLine}}`.
### Image Embeds
Each image or PDF object can be defined as:
`x;y;pages;urlToImageOrPDF;linkToOpen;width;height`
#### **EXAMPLE** Sample code
```text theme={null}
20;80;0-;bytescout-com.s3-us-west-2.amazonaws.com/files/pdf-edit/logo.png;www.pdf.co;200;200
```
#### **EXAMPLE** Sample code
To put multiple objects, just use the `|` separator between objects.
```text theme={null}
100;180;0-;bytescout-com.s3-us-west-2.amazonaws.com/files/pdf-edit/logo.png|400;180;0-;bytescout-com.s3-us-west-2.amazonaws.com/files/pdf-edit/logo.png;www.pdf.co;200;200
```
You can also use a [base64 datauri](https://developer.mozilla.org/en-US/docs/Web/HTTP/Basics_of_HTTP/Data_URLs) embedded image or a `filetoken://` link to a file from [PDF.co Built-In Files Storage](https://app.pdf.co/files).
### Fillable Form Fields
To fill fields in a **PDF** form, use the format `page;fieldName;value`.
To define the `font name`, `size` and `style` for the form input, use the following schema:
`page;fieldName;Field Text;size+bold+italic+underline+strikeout;FontName`
#### **EXAMPLE** Sample code
```text theme={null}
0;editbox1;text for my edit box;12+bold;Arial
```
#### **EXAMPLE** Sample code
To fill a checkbox, use `true` against the target checkbox object.
```text theme={null}
0;checkbox1;true
```
#### **EXAMPLE** Sample code
To separate multiple objects, use the `|` separator.
```text theme={null}
0;editbox1;text for my edit box;12+bold;Arial|0;editbox2;text for another edit box;12;Arial|0;checkbox1;true
```
### Source PDF URL & Google
When using **Google Drive**, it’s typically recommended to choose the **File** option. For more advanced file integration techniques, see [Integrating File Sources with pdf.co](/integrations/zapier/input-file-sources).
## Input
The Zapier action doesn't expose every PDF.co API parameter as a field. To pass a parameter that isn't shown, use the **Custom Profiles** field with `std_params`. See [Standard Parameters](/api/profiles#standard-parameters).
| Name | Description | Required |
| - | - | - |
| **Source PDF** | Provide the URL of the PDF document, or leave blank to create a new PDF from scratch. | No |
| [**Text Annotations**](#text-annotations) | Specify each text annotation using the format `x;y;page;text`. See [Text Annotations](#text-annotations) for more information. | Fill at least one |
| [**Image Embeds**](#image-embeds) | Define each image using the format `x;y;page;urltoimage;link;width;height`. Use PDF.co [PDF Inspector](https://app.pdf.co/pdf-edit-add-helper) to find or measure PDF coordinates. | Fill at least one |
| [**Fillable Form Fields**](#fillable-form-fields) | Specify each fillable field value in the format `page;fieldName;value`. Use the [PDF.co Info Tool](https://app.pdf.co/pdf-info) or the **Get PDF Info** PDF.co step for field names in PDF forms. | Fill at least one |
| **Output PDF Name** | Name of the output PDF file. | No |
| **Allow Empty Text and Image Objects** | Enable to process text objects and images even with empty URLs. | No |
| **Auto-trim Input Values** | Automatically removes leading/trailing spaces and line breaks from input text values. | No |
| **Template Data** | Input data in `JSON` format that can be used within annotations and fields. | No |
| **Custom Profiles** | A `JSON` string which adds options for the conversion process. See [Custom Profiles](#custom-profiles) for more. | No |
## Data Format and Examples
### Text Annotations
This parameter represents one or more text objects to add to a **PDF**. Each text object is made of a parameter separated by the ; symbol. It uses the format:
`x;y;pages;text;fontSize;fontName;fontColor;link;transparent;width;height;alignment`
#### **EXAMPLE** Sample code
Adds a text annotation, which links to `www.pdf.co`, to the `20,20` coordinate of all pages in a document (by using: `0-`). The text annotation uses the `Arial` font in red (by using `FF0000`) with a font size of `24`. It has a transparent background, a defined `300` by `200` bounding box and with text aligned to the `right`.
```text theme={null}
20;20;0-;Test Text;24;Arial;FF0000;www.pdf.co;true;300;200;right
```
#### **EXAMPLE** Sample code
Where `24` is the font size. You can also add styles along with the font size using the following modifiers:
* `+bold`
* `+italic`
* `+underline`
* `+strikeout`
```text theme={null}
20;20;0-;Testing Text;24+bold+italic;Arial
```
#### **EXAMPLE** Sample code
Another example with `bold`, `italic`, `underline` and `strikeout` styles would be as follows:
```text theme={null}
250;20;0-;Text1|250;30;0-;Text2|250;50;0-;Text3
```
#### **EXAMPLE** Sample code
To put multiple objects, just use the `|` separator between objects.
```text theme={null}
20;20;0-;Test Text;24;Arial;FF0000;www.pdf.co;true;300;200;right
```
If you need to insert a line break then use `\n` or `{{$$newLine}}`.
### Image Embeds
Each image or PDF object can be defined as:
`x;y;pages;urlToImageOrPDF;linkToOpen;width;height`
#### **EXAMPLE** Sample code
```text theme={null}
20;80;0-;bytescout-com.s3-us-west-2.amazonaws.com/files/pdf-edit/logo.png;www.pdf.co;200;200
```
#### **EXAMPLE** Sample code
To put multiple objects, just use the `|` separator between objects.
```text theme={null}
100;180;0-;bytescout-com.s3-us-west-2.amazonaws.com/files/pdf-edit/logo.png|400;180;0-;bytescout-com.s3-us-west-2.amazonaws.com/files/pdf-edit/logo.png;www.pdf.co;200;200
```
You can also use a [base64 datauri](https://developer.mozilla.org/en-US/docs/Web/HTTP/Basics_of_HTTP/Data_URLs) embedded image or a `filetoken://` link to a file from [PDF.co Built-In Files Storage](https://app.pdf.co/files).
### Fillable Form Fields
To fill fields in a **PDF** form, use the format `page;fieldName;value`.
To define the `font name`, `size` and `style` for the form input, use the following schema:
`page;fieldName;Field Text;size+bold+italic+underline+strikeout;FontName`
#### **EXAMPLE** Sample code
```text theme={null}
0;editbox1;text for my edit box;12+bold;Arial
```
#### **EXAMPLE** Sample code
To fill a checkbox, use `true` against the target checkbox object.
```text theme={null}
0;checkbox1;true
```
#### **EXAMPLE** Sample code
To separate multiple objects, use the `|` separator.
```text theme={null}
0;editbox1;text for my edit box;12+bold;Arial|0;editbox2;text for another edit box;12;Arial|0;checkbox1;true
```
### Source PDF URL & Google
When using **Google Drive**, it’s typically recommended to choose the **File** option. For more advanced file integration techniques, see [Integrating File Sources with pdf.co](/integrations/zapier/input-file-sources).
 ## Output
| Name | Description |
| - | - |
| `url` | The temporary **URL** on the **PDF.co** file server. |
| `outputLinkValidTill` | A timestamp which indicates how long the `url` will be available for. |
| `error` | Details of any errors (if any). |
| `status` | The [response status](/api/introduction) code. If all good this will be `200`. |
| `name` | The name of the file. |
| `jobId` | The unique identifier for the job. |
| `credits` | The credits spent on the process. |
| `remainingCredits` | The credits left on your account. |
| `duration` | The time it took for the process. |
## Custom profiles
Use Custom [Profiles](/api/profiles) to enhance your workflow with additional processing options. Enter `JSON` configuration to customize OCR settings, output format, text extraction methods, and more.
## Output
| Name | Description |
| - | - |
| `url` | The temporary **URL** on the **PDF.co** file server. |
| `outputLinkValidTill` | A timestamp which indicates how long the `url` will be available for. |
| `error` | Details of any errors (if any). |
| `status` | The [response status](/api/introduction) code. If all good this will be `200`. |
| `name` | The name of the file. |
| `jobId` | The unique identifier for the job. |
| `credits` | The credits spent on the process. |
| `remainingCredits` | The credits left on your account. |
| `duration` | The time it took for the process. |
## Custom profiles
Use Custom [Profiles](/api/profiles) to enhance your workflow with additional processing options. Enter `JSON` configuration to customize OCR settings, output format, text extraction methods, and more.
 ### Sample JSON
```json theme={null}
{ "ImageOptimizationFormat": "JPEG", "JPEGQuality": 25, "ResampleImages": true, "ResamplingResolution": 120, "GrayscaleImages": true }
```
You can use any regular API parameter from the [API Reference](/api) within Zapier using the `std_params` feature in profiles. The `std_params` enables the definition of regular API parameters in a JSON format, See [Standard Parameters](/api/profiles#standard-parameters) for detailed documentation and examples.
| Parameter | Type | Default | Description |
| - | - | - | - |
| `outputDataFormat` | string | - | If you require your output as base64 format, set this to base64 |
| `Pages[0].SetCropBox()` | array\[string] | - | Crop a PDF file using an array to define the crop area. The crop box is defined by a rectangle \[x, y, width, height] in PDF points (1 Point = 1/72 inches). |
| `DisableLigatures` | boolean | `false` | To disable ligaturization, for example for Hebrew, use the following: |
| `FlattenDocument()` | boolean | `false` | Flattening a document renders it as read-only. Handy if you want to remove editing or copying capability. |
| `DataEncryptionAlgorithm` | string | - | Controls the encryption algorithm used for data encryption. See User-Controlled Encryption for more information. The available algorithms are: AES128, AES192, AES256. |
| `DataEncryptionKey` | string | - | Controls the encryption key used for data encryption. See User-Controlled Encryption for more information. |
| `DataEncryptionIV` | string | - | Controls the encryption IV used for data encryption. See User-Controlled Encryption for more information. |
| `DataDecryptionAlgorithm` | string | - | Controls the decryption algorithm used for data decryption. See User-Controlled Encryption for more information. The available algorithms are: AES128, AES192, AES256. |
| `DataDecryptionKey` | string | - | Controls the decryption key used for data decryption. See User-Controlled Encryption for more information. |
| `DataDecryptionIV` | string | - | Controls the decryption IV used for data decryption. See User-Controlled Encryption for more information. |
This documentation is built and hosted on [Mintlify](https://mintlify.com), a developer documentation platform.
### Sample JSON
```json theme={null}
{ "ImageOptimizationFormat": "JPEG", "JPEGQuality": 25, "ResampleImages": true, "ResamplingResolution": 120, "GrayscaleImages": true }
```
You can use any regular API parameter from the [API Reference](/api) within Zapier using the `std_params` feature in profiles. The `std_params` enables the definition of regular API parameters in a JSON format, See [Standard Parameters](/api/profiles#standard-parameters) for detailed documentation and examples.
| Parameter | Type | Default | Description |
| - | - | - | - |
| `outputDataFormat` | string | - | If you require your output as base64 format, set this to base64 |
| `Pages[0].SetCropBox()` | array\[string] | - | Crop a PDF file using an array to define the crop area. The crop box is defined by a rectangle \[x, y, width, height] in PDF points (1 Point = 1/72 inches). |
| `DisableLigatures` | boolean | `false` | To disable ligaturization, for example for Hebrew, use the following: |
| `FlattenDocument()` | boolean | `false` | Flattening a document renders it as read-only. Handy if you want to remove editing or copying capability. |
| `DataEncryptionAlgorithm` | string | - | Controls the encryption algorithm used for data encryption. See User-Controlled Encryption for more information. The available algorithms are: AES128, AES192, AES256. |
| `DataEncryptionKey` | string | - | Controls the encryption key used for data encryption. See User-Controlled Encryption for more information. |
| `DataEncryptionIV` | string | - | Controls the encryption IV used for data encryption. See User-Controlled Encryption for more information. |
| `DataDecryptionAlgorithm` | string | - | Controls the decryption algorithm used for data decryption. See User-Controlled Encryption for more information. The available algorithms are: AES128, AES192, AES256. |
| `DataDecryptionKey` | string | - | Controls the decryption key used for data decryption. See User-Controlled Encryption for more information. |
| `DataDecryptionIV` | string | - | Controls the decryption IV used for data decryption. See User-Controlled Encryption for more information. |
This documentation is built and hosted on [Mintlify](https://mintlify.com), a developer documentation platform.